wAo: a 2 DOF swing
Its got that large swing energy (Picture: Shreyas Kapur)
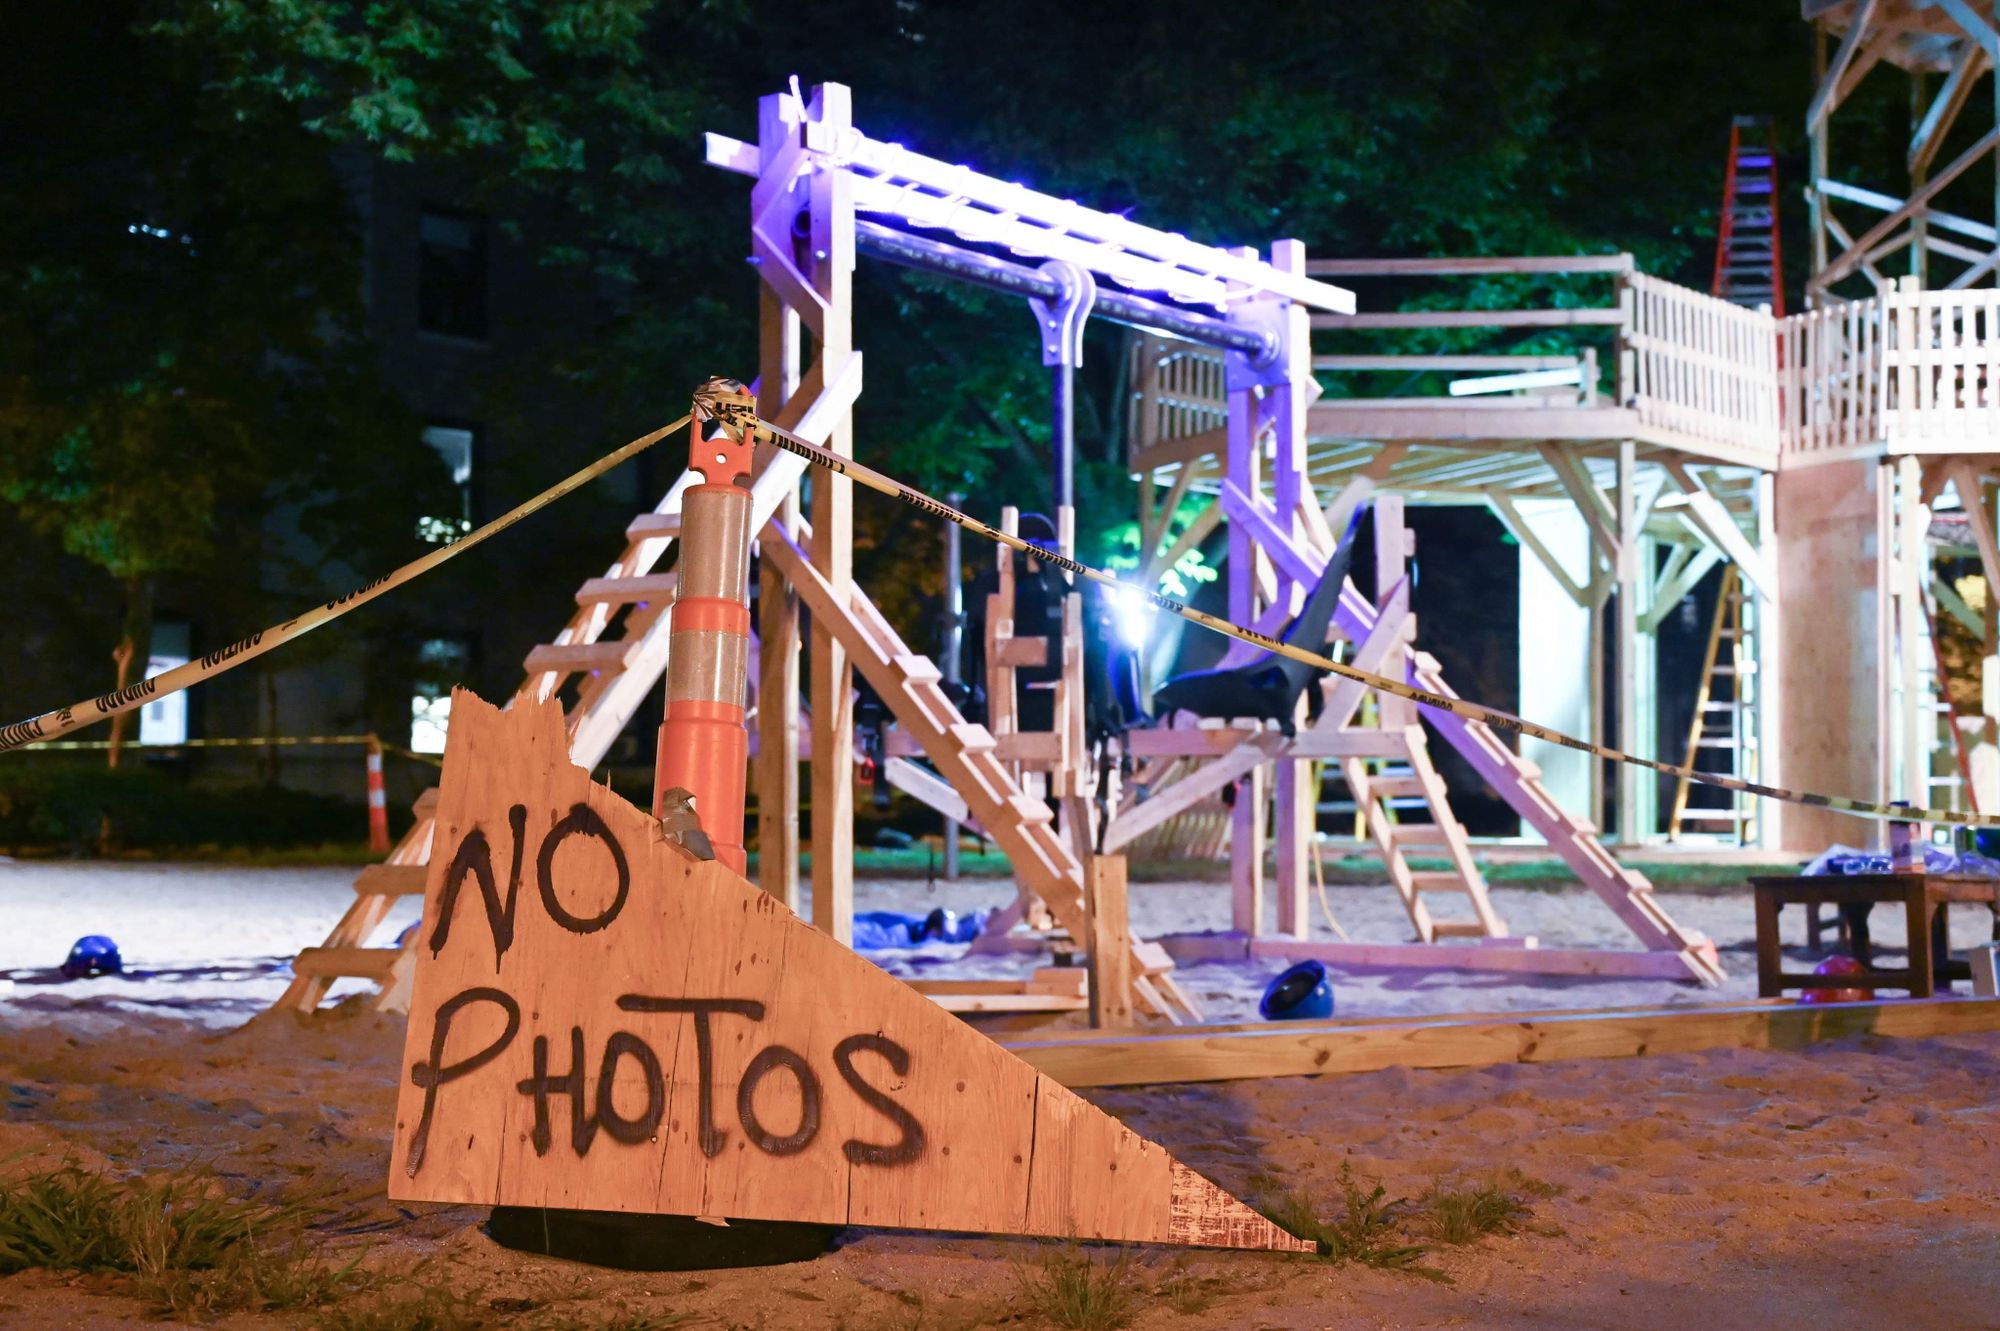
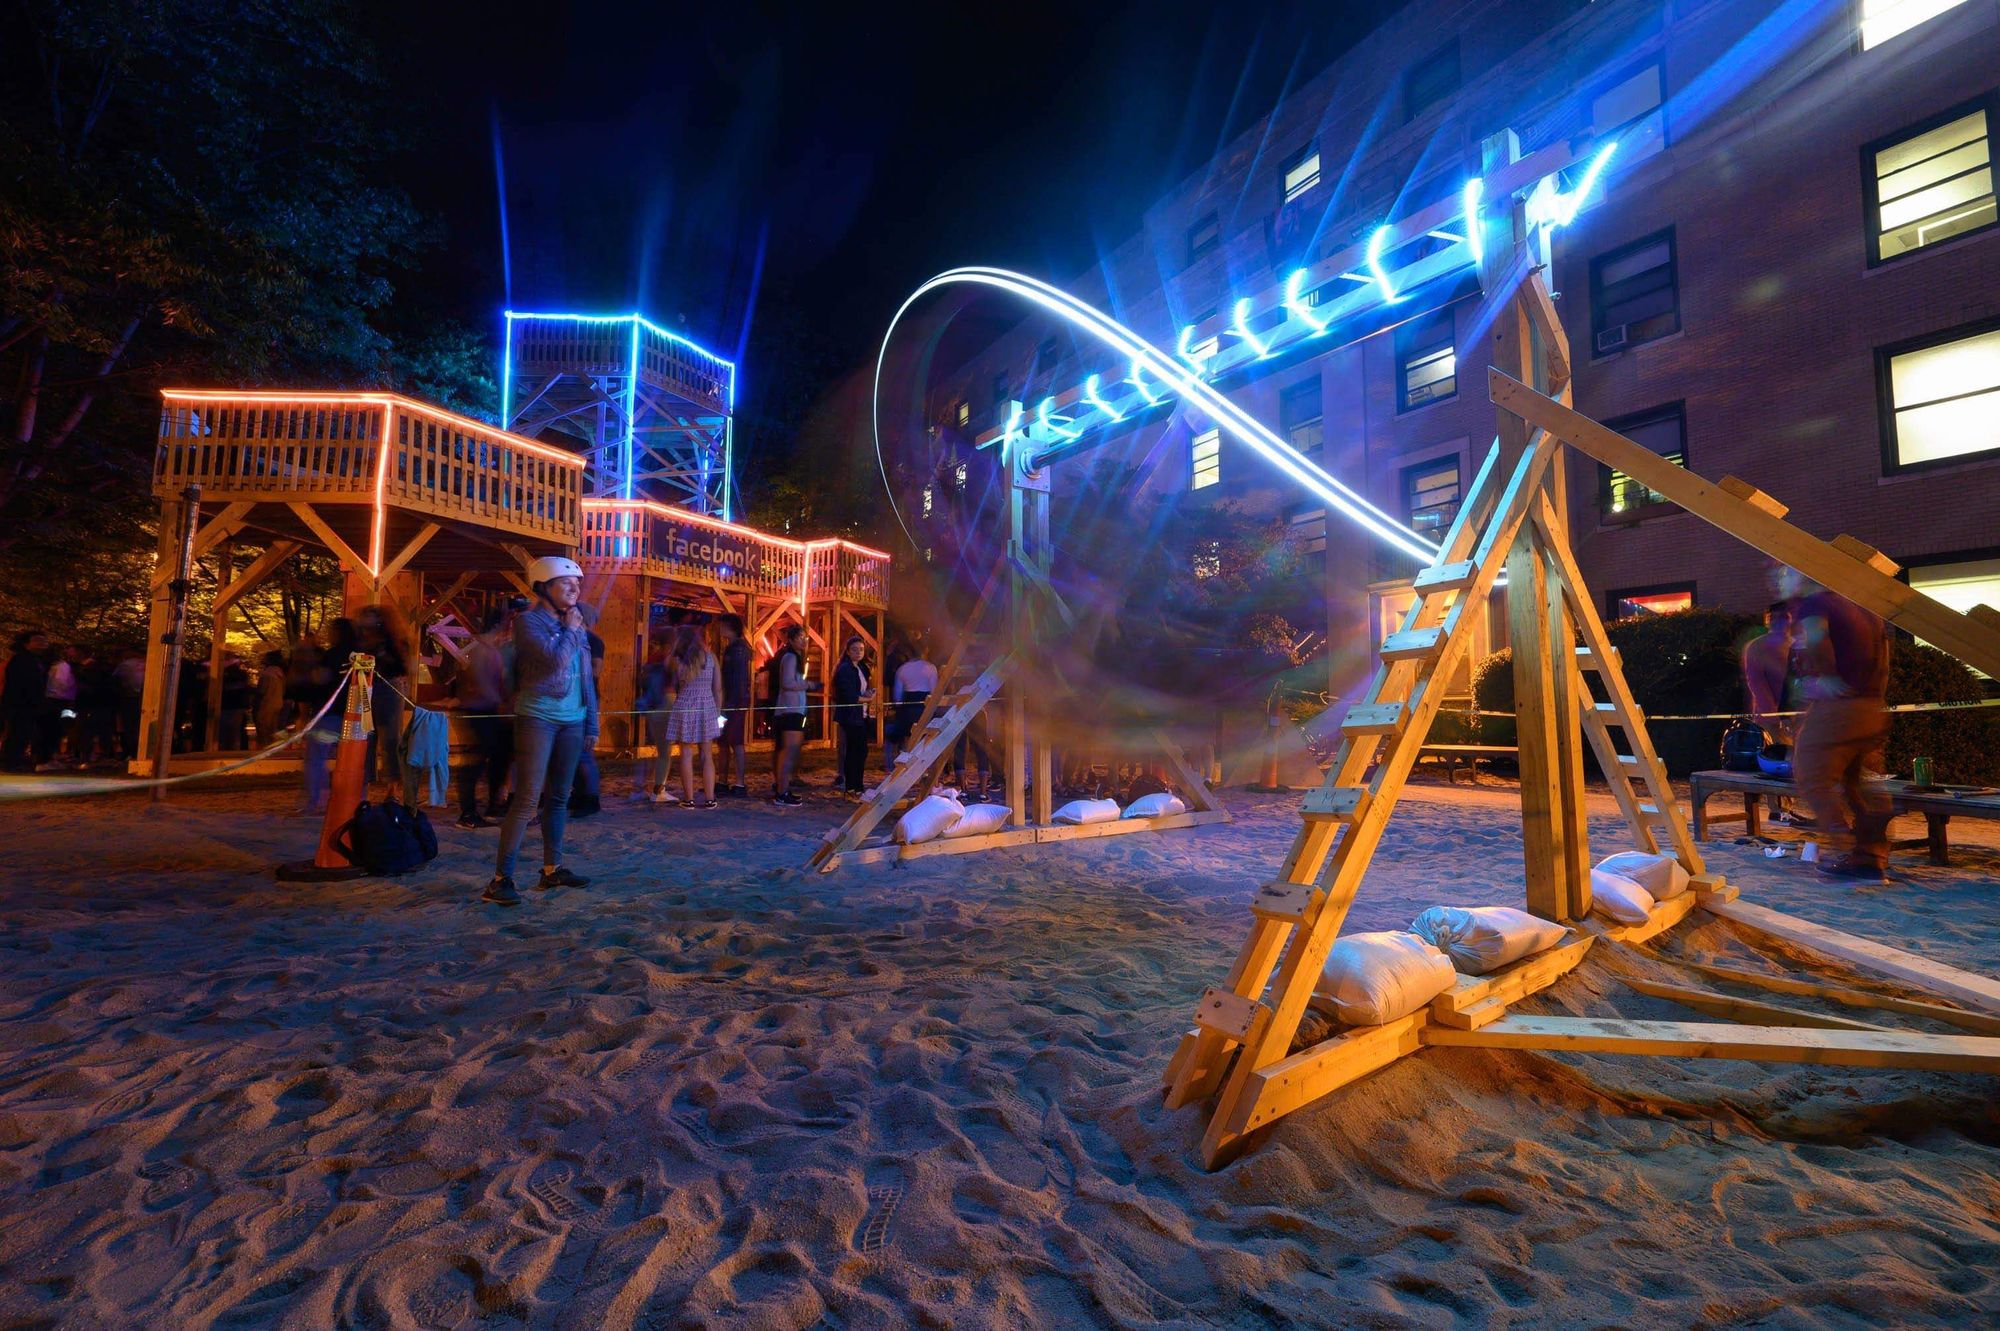
As is tradition every year, East Campus builds a bunch of temporary wooden structures for the incoming freshmen during REX. In previous years, students have made wooden roller coasters, large rotating climbing walls, and a large trebuchet that totally wasn't used to swing people around ever.
Continuing the tradition of large moving masses with people on them, a couple of friends and I decided to build a large, 2-DOF swing like Delirium. In these swings, riders not only move back and forth like in a normal swing, but also rotate around the shaft that is supporting them.
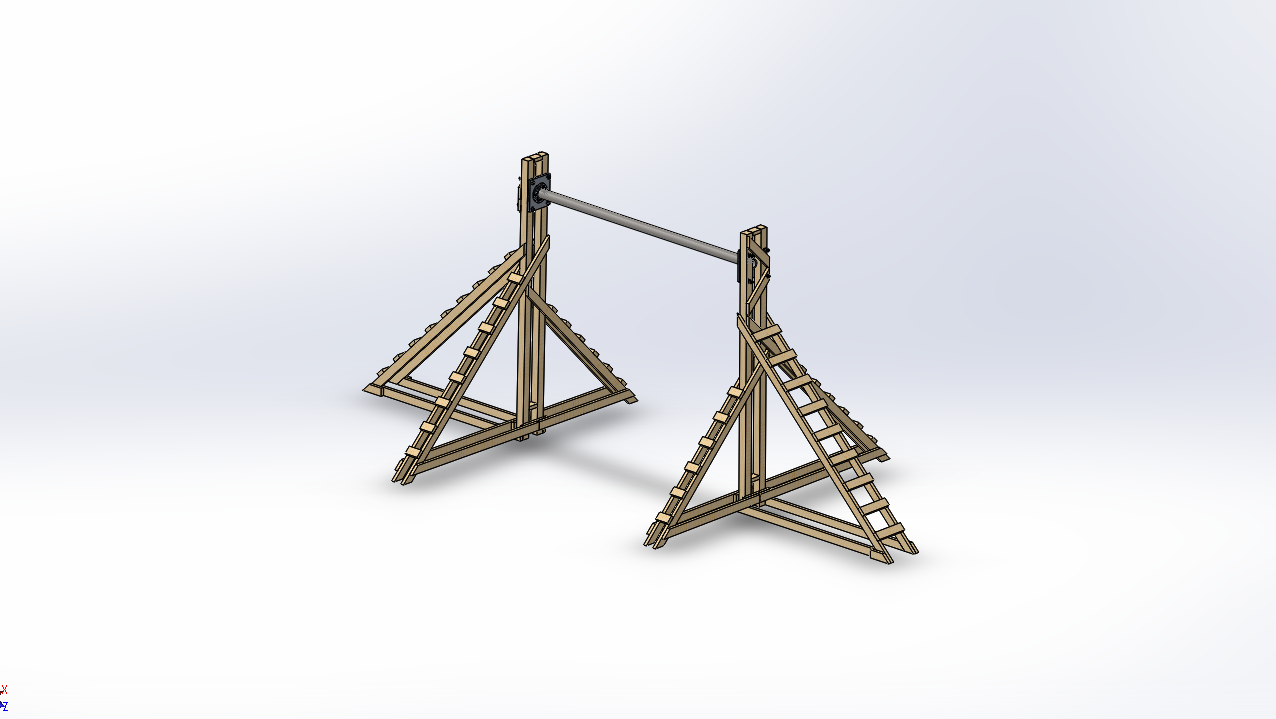
Like most REX projects, wAo was designed in the last couple of evenings leading up to the deadline for us to submit all our projects to the structural engineer that MIT hired so that we didn't inadvertently injure anybody. Because of our lack of time, we opted to go for a simpler design with straight sides and a long horizontal axle rather than imitating Delirium, where the sides start far apart on the ground to clear the carriage and come closer together at the top in order to minimize the amount of bending in the horizontal shaft.
Because we had no idea about how fast people could spin the carriage, we decided to simplify the load on the structure from both a force from gravity and a moment from the gyroscopic precession to just the force. We were then able to decide on the diameter and wall thickness for the horizontal axle, and check that the assorted bolts, bearings, adapting plates, and vertical tube wouldn't fail, even with a decently large safety factor due to the simplification of our math. At the time, this seemed like the sketchiest part of the project, as none of us had previous experience building anything of this scale, and had no sense of intuition about whether our calculations were correct or not.
Based off our math, we decided on a steel horizontal axle that had a 4" OD and 0.5" wall. This pipe was supported at the ends by two 6022 bearings in giant, 3/4" thick aluminum bearing blocks that we made. By oversizing the bearings in relation to the pipe, we were able to simplify assembly - the two frame sides didn't have to be as accurately positioned in relation to each other in order for the shaft to go through. Since the carriage never makes more than a half revolution, the main downside of the shaft shifting around in the bearing during operation was irrelevant.
The bearing blocks were mounted to two independent structures built around two vertical 10' sections of 4x4. Each structure had copious amounts of cross bracing and was both partially buried and weighed down with sandbags to prevent shifting during ride operation.
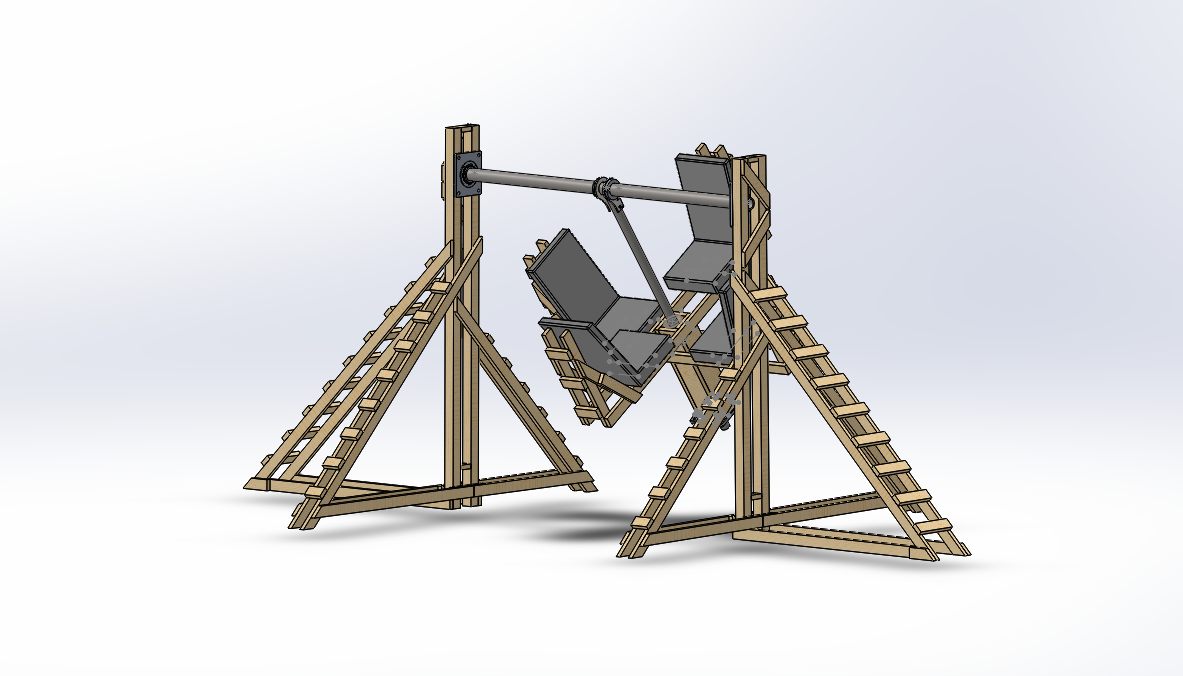
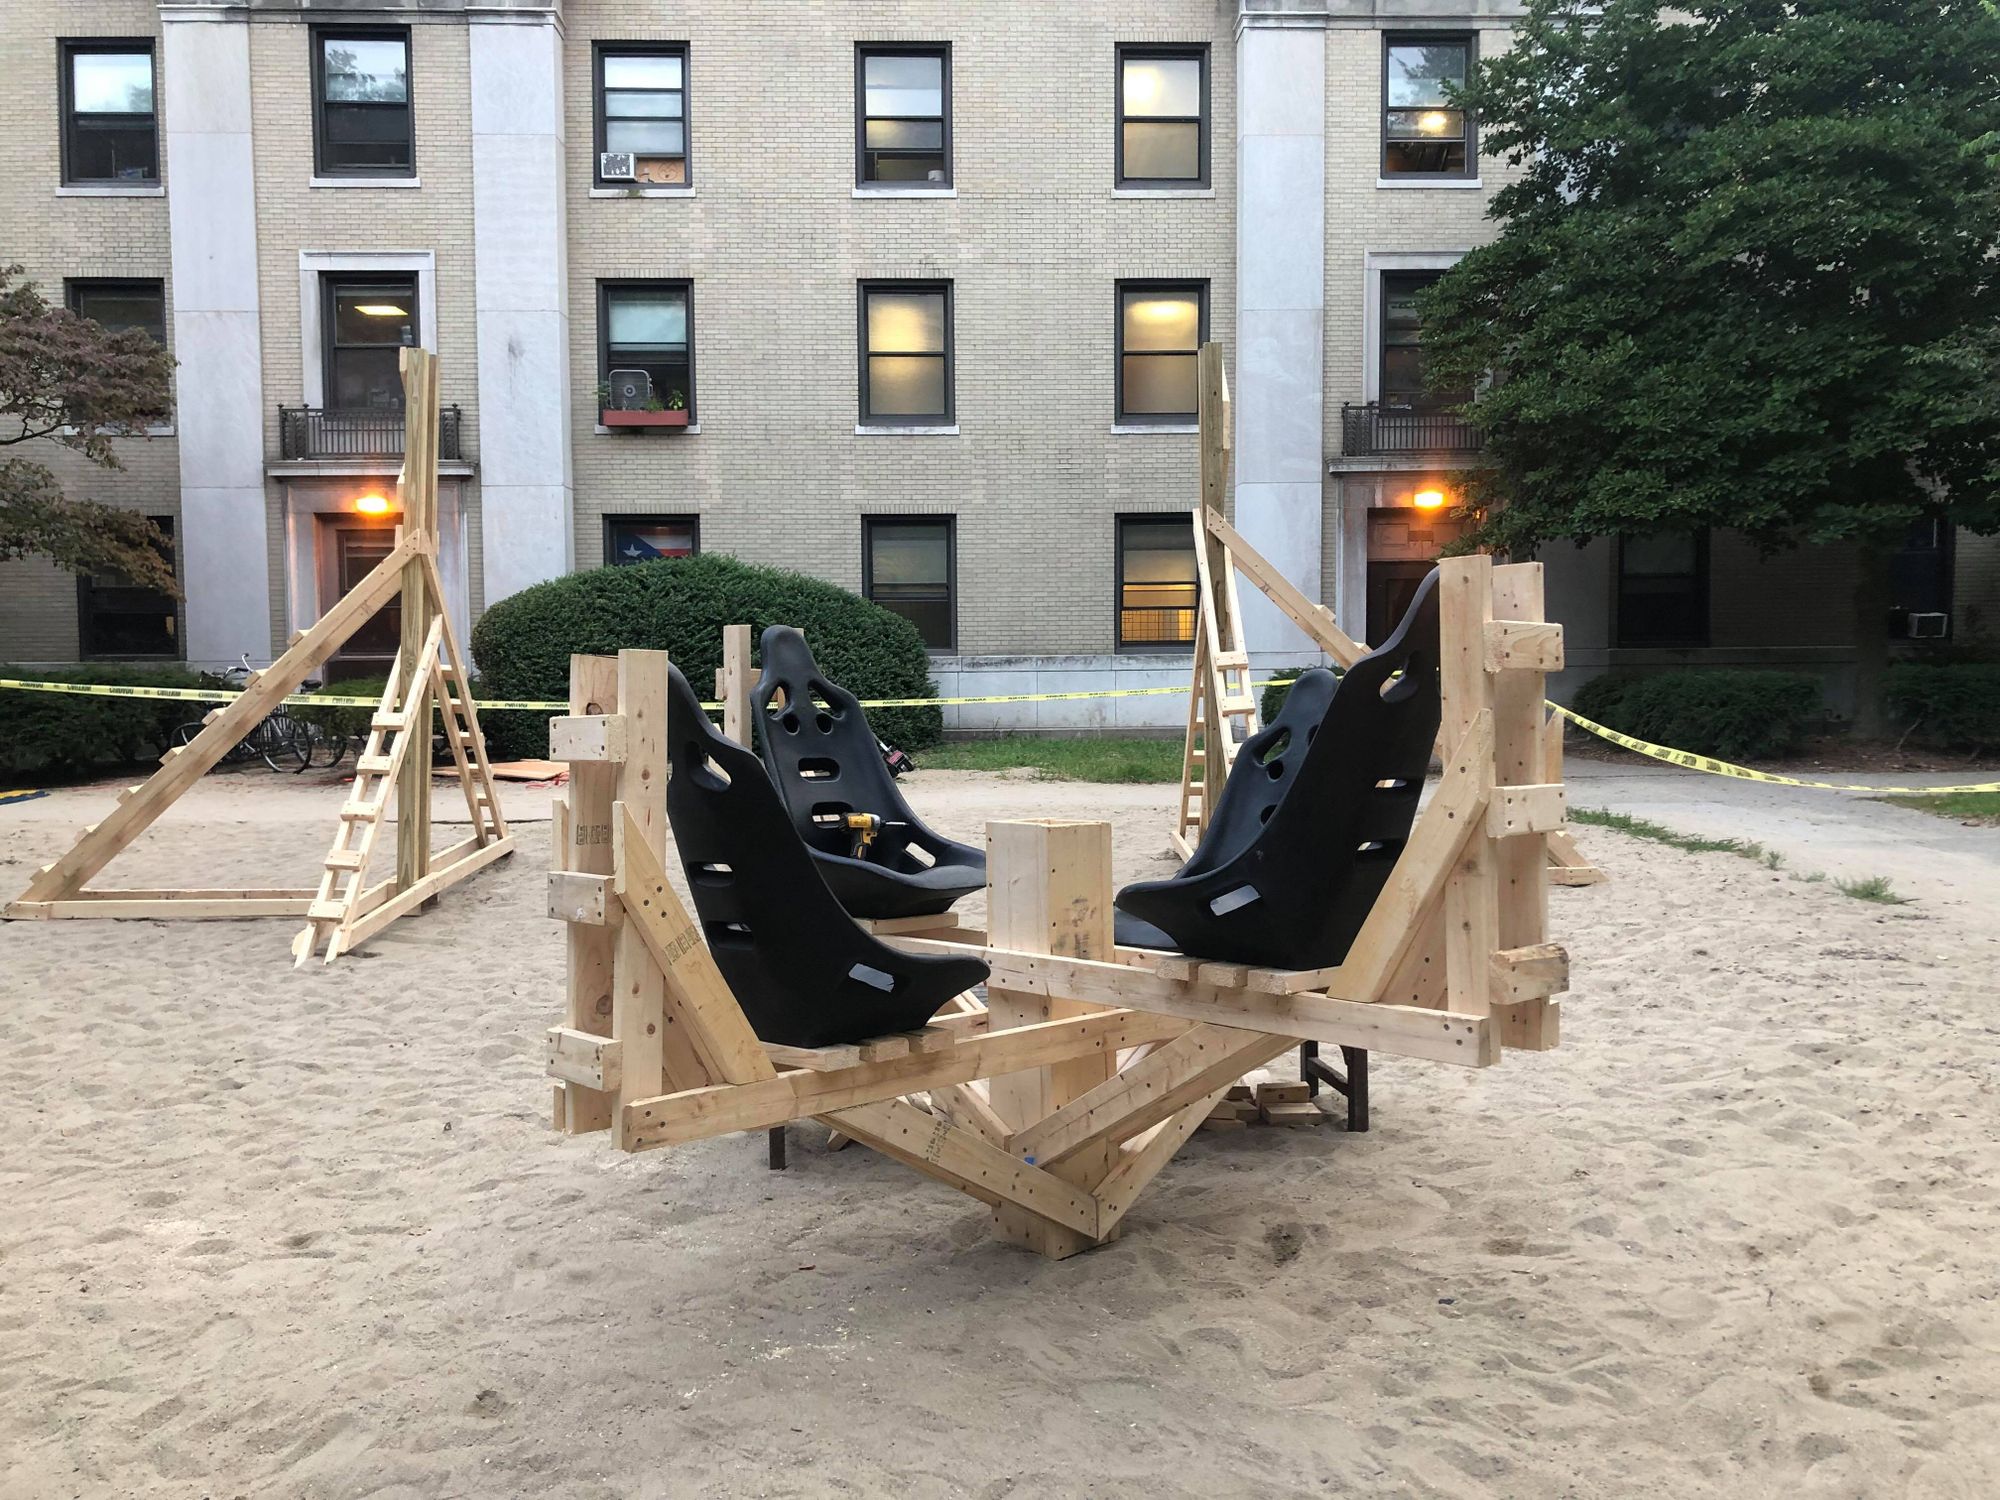
The carriage and vertical axle were assembled in a similar way, with slightly oversized ball (6215) and taper bearings (5760-5720) set into thick aluminum plates with mild steel plates retaining them axially on the top and bottom of the carriage. The shaft came from JTR, the trebuchet mentioned earlier, and only had to be cut down to size. The two bearing assemblies were spaced apart with four 2x8s arranged in a square, with a truss structure built around that entire assembly to support the seats and mount seatbelts.
Because we were mildly concerned with keeping the bottom taper bearing from sliding off the shaft, I came up with this crazy shaft collar design. Its made out of 4 separate waterjet pieces of 3/4" aluminum, with 2 3/8" bolts going through the entire pipe at 90 degrees from each other. When assembling the collar onto the axle, we loosely put everything together, then sorta preloaded it by pressing down while tightening down the through bolts, inter-plate bolts, and clamping bolts in that order. I think that this is the order that results in the best chance at the bolts sharing the load equally.
When it was time to actually build the ride, we hit a couple of bumps. While the structure itself wasn't very complicated, we only had a week and a half to finish the entire thing, with no frosh labor available in the first week. In addition to this, one other lead and I both still had our jobs through the first week, and another lead wouldn't be in Cambridge until after the first week. Worst of all, the supplier of the large tube acting as the horizontal axle told us that he wouldn't be able to get the tube to their Massachusetts warehouse until the Friday before the East Side Party, 2 days before the hard deadline for the ride.
Because the horizontal shaft got here so late, we needed to make sure that everything would fit together on the first try, as we didn't really have time after Saturday to disassemble and re-machine parts. To minimize this, we needed to assemble as much of the ride as possible without the horizontal shaft.
The build started with a couple of 2 or 3 hour long sessions in the CSAIL waterjet room, spread over a couple of days, waiting for it to cut out blanks for the bearing blocks and other metal pieces. For the features that needed to be held to a tighter tolerance, mainly the bearing bores, I machined them out on a protoTRAK instead of just smashing the bearings into the holes like a madman. I also post-machined all the shaft collars and made spacers for the seatbelts and the horizontal bearing retaining plates.

Meanwhile, the other two leads who were here over the summer (Sofia and Gaby), started pre-cutting wood for and assembling the two side structures. The structures were first built on the ground, then rotated 90 degrees and moved into roughly their final positions.
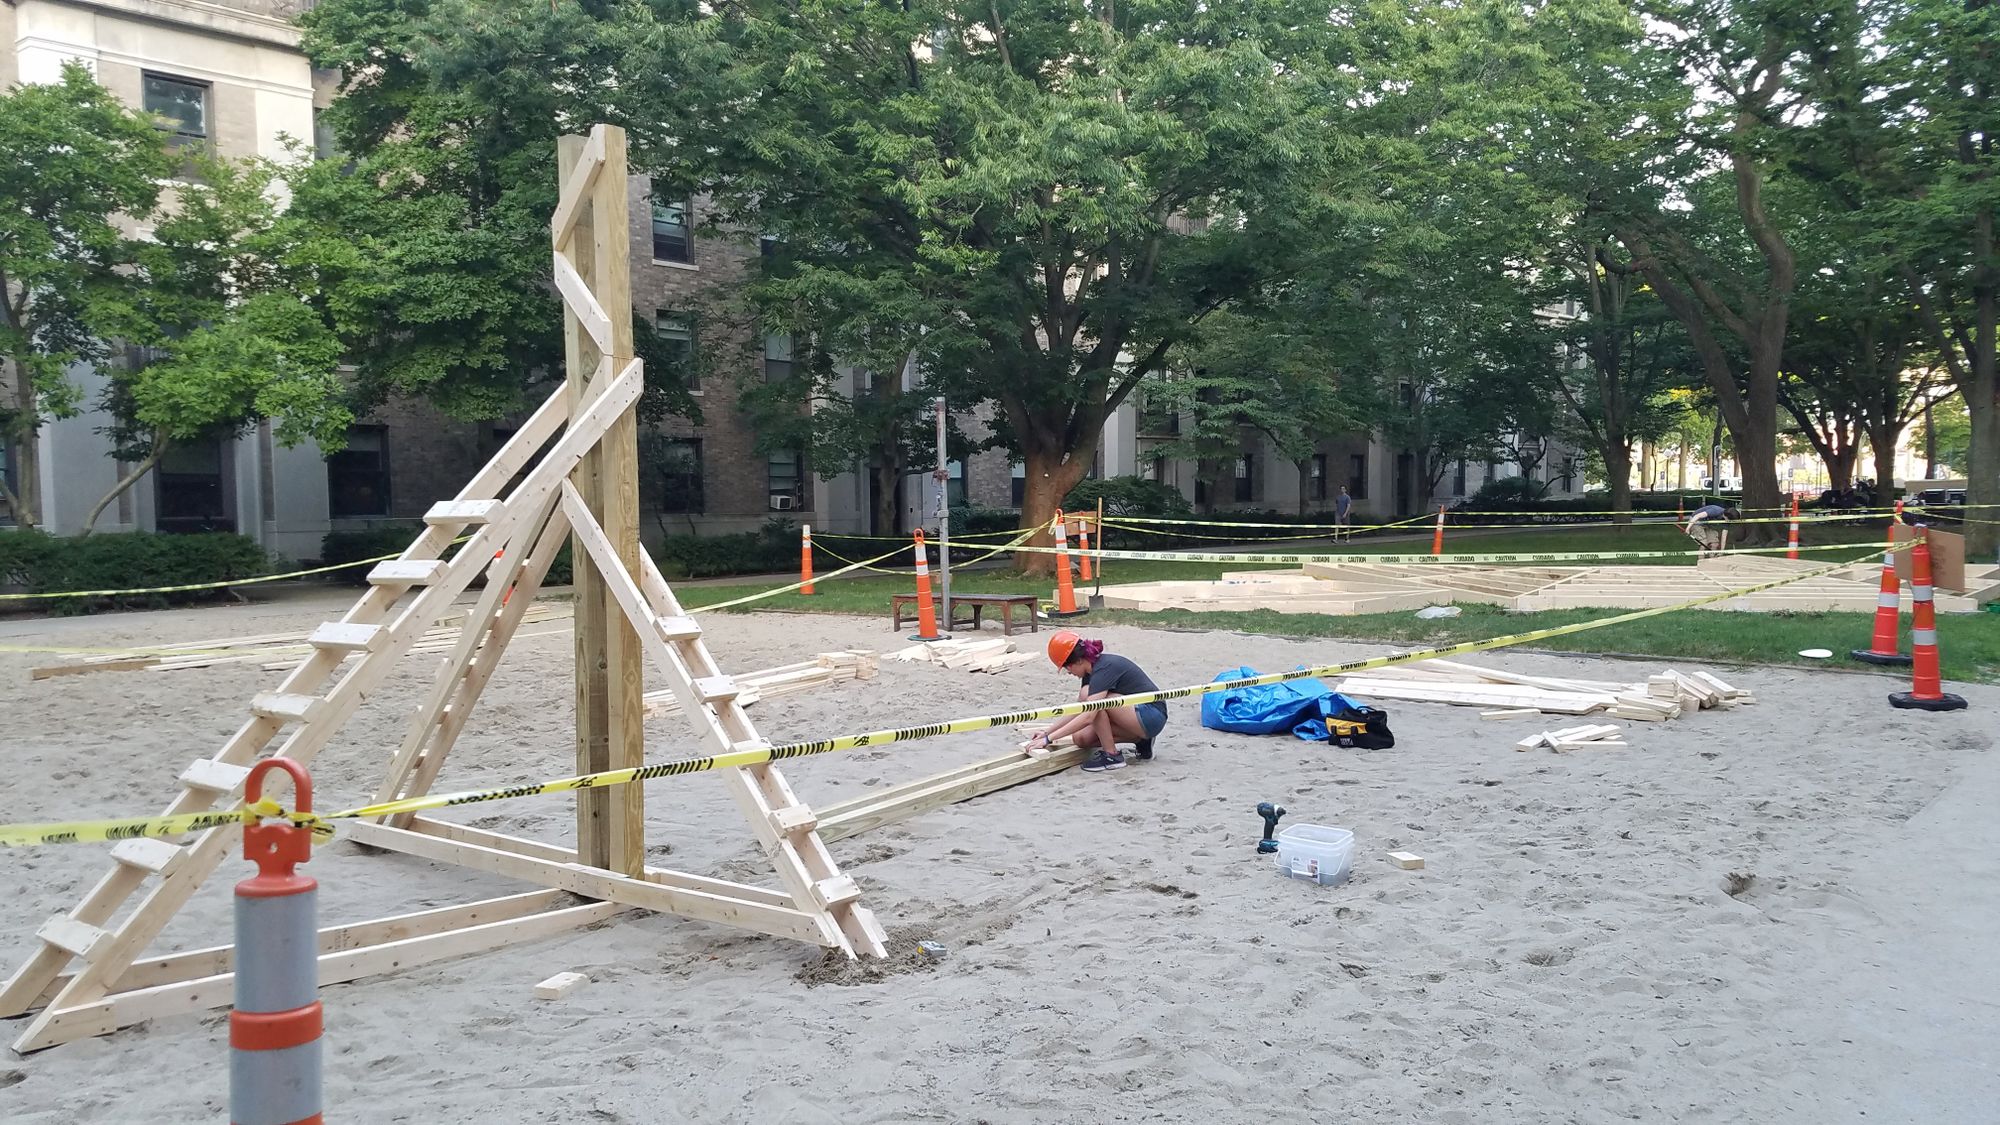
After finishing the two vertical structures, we started construction of the carriage assembly.
Once both of these structures were finished and the bearings were installed, we drilled a couple of holes in the vertical axle for the bottom collar and wheel and installed the vertical axle in the carriage, but couldn't do a lot more until the horizontal axle came.
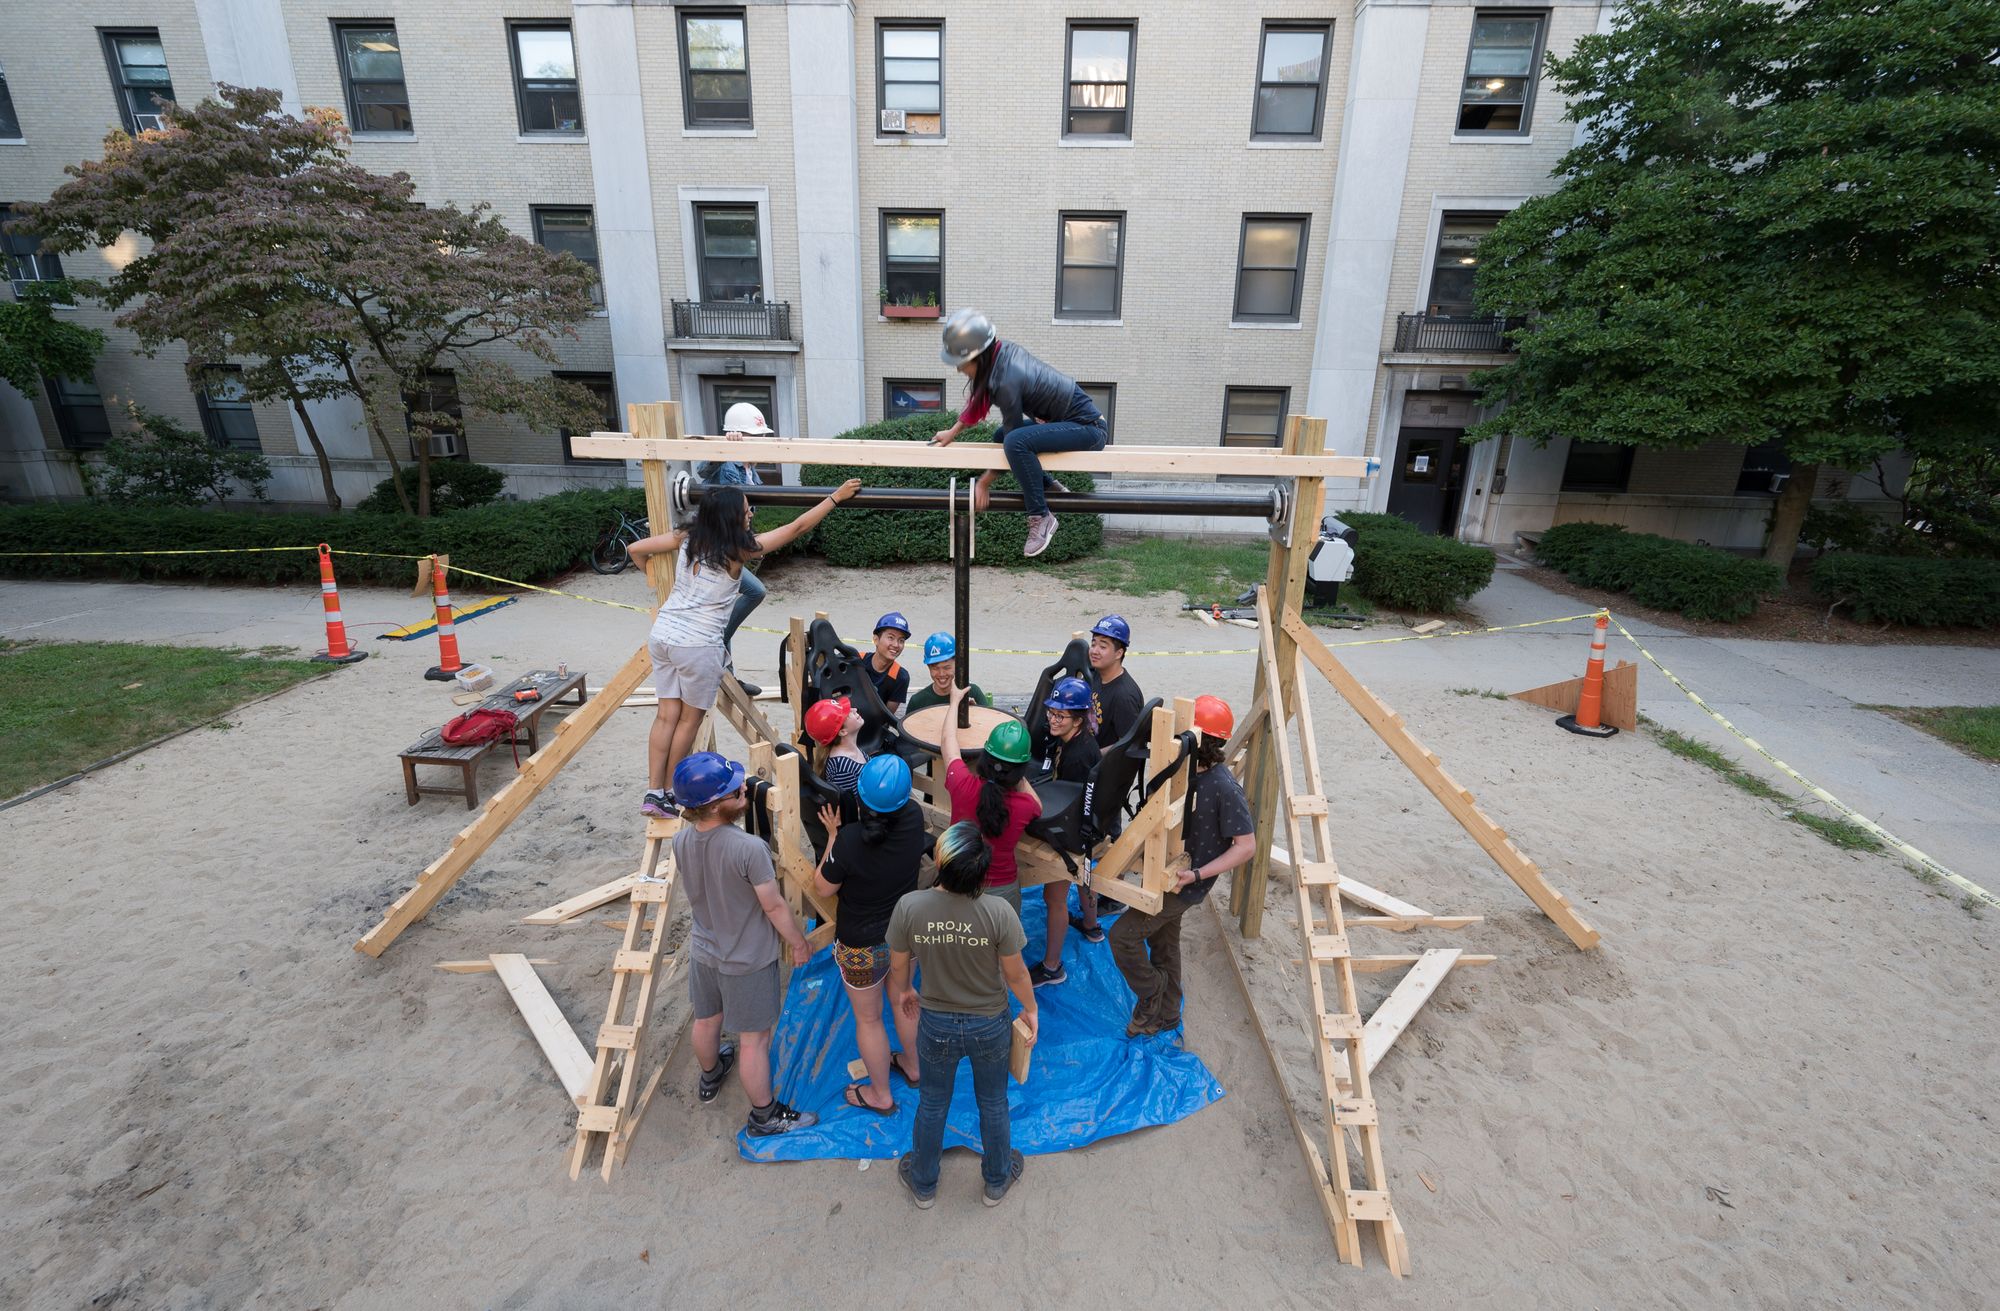
The axle actually ended up arriving a day early, so we were able to put the vertical axle mounting plates on the horizontal axle and get the axle installed into the vertical structures without a hitch.
With the help of a bunch of pre-frosh, we were able to lift the carriage into place while we frantically sent the two top bolts through the vertical axle and mounting plates.
While we were testing the ride in the days leading up to the East Side Party, we discovered cracks that had formed in the vertical 4x4s. We figured that the cracks were due to the expansion and shrinkage of the wood, as we had left the structure uncovered overnight in the rain. The cracks were also on the sides of the 4x4 farthest from the heartwood, which further supported our guess, as the heart of the tree is denser and doesn't absorb as much water as the sapwood.
For the rest of the time that the ride was operational, we checked the cracks with a piece of paper every half hour/couple of rides to make sure that they weren't propagating deeper into the wood.
After a week in the courtyard, all the temporary structures we had built for Rush were taken down, with most of the used wood being claimed by East Campus residents to build furniture for their own rooms. Unfortunately, wAo's short stint in the courtyard also had to end.